Although its a small thing, our single bunch of mondo grass is in gorgeous bloom at the moment, and it's something I think can only be truly appreciated close up! We also have a second clump of miniature mondo grass which is flowering as well. These plants are in the ground and form part of the garden of our rented property.
Something else thats flowering at the moment is our eldest chilli plant, whom is also heavily laden with bright red fruit! It's quite pretty, imho. I caught David looking up the internet yesterday to find out what can you do with recycled pistacio nuts. Tucking into a couple of handfuls of the yummies must have prompted the idea. He found a forum thread discussing it, which was quite funny (sorry, no link). Apparently, you can even put a small piece of water soaked cotton wool in a shell, place a bean sprout seed on it and wait a couple of days. If you have a bunch of these, you can float them in a dish of water as a table centre piece. The display of tiny floating boats, each with its own mini-tree has, apparently, earnt the contributor much praise from guests. How ridiculous! Do you seriously have nothing better to do with those brain cells? How about devoting that intellectual capacity of yours to World Peace? One of the more practical suggestions was to use it as garden mulch, as they can have the appearance of sea shells. So that's what we did, and because the chilli was looking particularly spectactular at the moment, I decided he deserved it. And there is even more room in there for the rest of the shells... after we eat up the emerald-green nuggets of pistascio! (nom nom nom)
And I can't forget our garlic chives, who are very happy nowadays and currently in full flower. No seeds as yet though, from what I can see. I checked the internet for images of garlic chives seeds and they will be little black seeds. We are eagerly awaiting the arrival of these new babies so we can plant lots more chives for yumminess!
Also, flowering at the moment is the native grevillea the landlord planted some months ago. Nice, and flushed with colour. How flourid.
Wednesday, January 27, 2010
Monday, January 25, 2010
Lucky Ladybug Pincushion
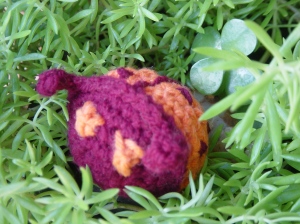
Oh yes, according to the pattern, this here is a Ladybug. As the last project of the day, I had to have another go at it because I had trouble with it the other morning and that ... bugged me! After two days of reading crochet patterns, surely I'll be able to do this.
Well, what I was doing wrong had nothing at all to do with the different crochet languages. Like almost all patterns I've read so far, this one is English. After the reading of the last two days, when I came back to this one I found it was very simple, just a small round ball really. What gave me the problem was I thought the "sc 3" in "sc 2, sc 2 in 1, (sc 3, sc 2 in 1)" meant "three single crochet on one hole" which of course is wrong and was why I ended up with a hyperbolic shape. I don't know why, but after reading crochet patterns for two days, when I came back to this I saw it simply as "single crochet three stitches each in its own space" lol. It's good to know my feverish production of small crochet projects over the last two days has helped my poor reading skills to improve.
The pattern called for glueing, felting and attaching, but I did none of that. I simply chain stitched the attennae as part of the chain stitch that goes over the top between the two colours, and used embroidery stitches for the eyes, dots and fine line at the back. A very simple project I'm unlikely to do again unless someone requests it as its a bit fiddly, fussy and not a particularly useful object. It felt like a primary school project to me. What practical use for something like this? Either a pincushion or a little critter for the kid's guest room. On the other hand, if I made this one out of plarn and filled it will plastic, it could go in the garden. We do need a Lucky Ladybug charm for our garden, to eat up all the nasty bugs that the real ladybugs would normally eat, if our landlords hadn't poisoned them all away. So that's where I decided to take the foto, in our garden the next morning. I can sense all the nasty bugs quivering with fear at the prospect of a Ladybug moving in!
Three Pink Hearts
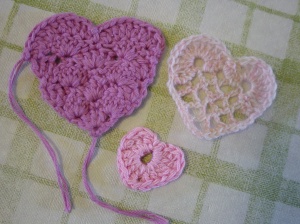
I did up some more hearts for practice, with varying degrees of difficulty but equal in cuteness!
The smallest heart is another go at a very easy heart pattern from Suzie's Stuff. The first one I did was blue and wonky, so I had another go and this one is much better and very cute. I'm thinking of slipping it in somewhere for good luck, like in David's wallet or sock drawer!
I thought I could try the square lattice heart by just looking at the picture, without reading the pattern. The change from square to round was trickier than the other heart I did from Drops Design, so I did peek at the pattern. I think my reading is getting a bit better, because I could find my place. I found a small bit of yarn left over from my childhood and used that, still not sure what will become of this heart yet.
The large heart of fans is impressive, still at first I thought I could try it without reading the pattern, but ended up following it which is from Donna's Crochet Designs. This one was a little more tricky than the others, but very nice. This one might end up in the trials and samples rug, or perhaps I'll save it for something special like a bag.
Teddy Bear Mary Janes
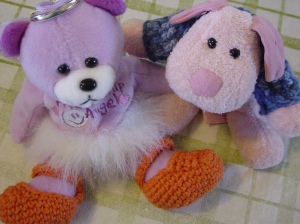
These orange mary jane slippers are meant to look silly on my purple angel beanie bear! I'm pleasantly surprised these worked out as well as they did. I did not follow a pattern at all, I made these slippers up freestyle. I did this activity to see if I was able to make up something to shape without a pattern. Maybe if I can do this, one day I'll be able to make my own freestyle socks.
First, I started by making a flat round that was as big as the sole on the teddy's foot. For this teddy, it took 4 rounds, with the 1st round being 8 sc. These are slightly large and because crochet has some stretch, when I make these again I'll make them the same size as (not larger than) the foot.
When the sole is done, finish off with a slip stitch then start the next round moving vertical up from the sole and no longer increasing stitches. For these, it took 2 rounds before it was time to do the toe. For the toe I turn, slip stitch and sc across the front, then turn and go back, adding a slip stich in the side as required. It's a freestyle so I just worked in a stitch as was required to form the platform on top of the toes. For this teddy, they took about 4 or 5 rows of sc. I then did another round along the rest of the shoe and did a couple of extra rows of about 3 sc each at the heel. Then it was time for the ankle strap which was simply a matter of chaining the required length then turning back with sc along the chain. Then I did the other side of the ankle strap, ending with about 5 chains in a little circle for the button hole. I put the shoes on the teddy to measure where the button should go and then used my tiniest hook to pull some yarn through the button to fasten it.
See? Angel just needed some high fashion shoes before hitting the town with her friend!
Sunday, January 24, 2010
Pink Ribbon Toy Shrug
One thing I really want to do is make myself a shrug but I tried a very simple pattern last week and it was epic fail! The large rectangle I made is now being saved, along with the big yellow round thing in the previous post, for what I think I might turn into a big blanket of all mismatched samples and trials. I was thinking, rather than risk wasting more time crocheting up a free shrug pattern from the net that might not turn out, I would trial some by first making miniatures for the soft toys in the kid's guest room.
This special pink fellow actually lives in our car's glove box. He was an impulse buy (yes, I do think it is a 'he'), from the chemist and is a fund raiser for breast cancer research. He has lovely soft fur that's comforting to hold and play with when we drive the 2 hours to visit my folks. The traffic on the highway is simply madness! The green ribbon in the foto is recycled from a special packet of chocolates that looked like olives brought back from Paris by Teena's mum on her recent trip to Europe. I thought he looked particularly cute with the cheerful bow, and all the way from Paris no less! Darrrrling, simply devine!! That is one well dressed bear.
I didn't follow a pattern, I just made it up. To make this little shrug for the breast cancer toy I first made a chain long enough that if made into a circle would fit around his hands. Basically the shape I made is widest in the middle and tapers to the ends. I used a DC and 1ch stitch. The 1st 3 rows of each end have 11 ch sp, the 4th and 4th last rows have 12, the 5th and 5th last rows have 13. I made about 8 rows of 14 ch sp for the wide part in the middle. I chain joined the 3 rows on each end to form sleeves. I also did 2 rows of treble stitches in the inside of the sleeve joins to form chest panels, the 1st row had 3 trebles into the same space (the sleeve join) and the 2nd row had 6 trebles, 2 in each ch sp. I chained up a little tie to make a bow at the front.
Here are some grown up shrugs that I might like to try one day ...
http://www.garnstudio.com/lang/en/visoppskrift.php?d_nr=99&d_id=20&lang=en
http://www.garnstudio.com/lang/en/visoppskrift.php?d_nr=111&d_id=25&lang=en
http://www.garnstudio.com/lang/en/visoppskrift.php?d_nr=99&d_id=3&lang=en
Labels:
blue,
clothes for toys,
Crochet,
pink,
Pink Ribbon,
teddy bears,
toys
A Day of Crochet Trials
I spent the entire day yesterday trying new small crochet projects (except for when I did a quick run to OS with the guild and some pugs for the weekly on my paladin tank, Yulara!) Recording this learning process will be good for me to look back over later, I'm sure!
To start me off, I had a go at this four leaf clover. It looked pretty simple and I figured it could be used as a lucky charm fridge magnet. At the start of the day my purpose was to work on my crochet pattern reading skills, and this one went fine.
I was off to a good start, so I thought to try something a little more tricky with this three layer flower. I followed the large flower pattern and discovered I didn't know what "bpsc" was. Turns out that's "back post single crochet" and I learned how to do it by watching the youtube video.
After these successes I thought I would try a little lady bug pattern I saw. It started off with the magic ring, which was great to learn so I can make my start rings small if I wanted. But the lady bug was not working out at all, all the extra stitches formed a type of hyperbolic shape and it reminded me of what I kept getting when I was trying the beanie pattern at crochetspot. Then I remembered that there are two crochet languages, English and American. Crochet Australia has several charts on how stitches, yarns and hooks vary between the two. I also did some reading up on Wikipedia on the history of crochet, which of course was very enlightening. All this made me wonder that that beanie pattern is American, so I went back and tried it again, this time doing English DC instead of SC, and guess what... it worked! But when the ball of yellow yarn I quickly grabbed to try this ran out I thought that I would put in a different colour. I fooled around with some wavy stitches, trying something I learnt in the morning from those little round patterns and made up a stitch (sl st sc hdc 3dc hdc sc). From Smart Knitting-Crocheting I found some example of stitches and chose a wavy fan pattern. The diagram was very easy to read and a good alternative than trying to read a pattern when I wasn't sure if DC =/= SC !! But my initial row didn't match so I unwound it and did it again. I thought the pattern would simply continue the beanie, as it was up to the point where the rounds were no longer increasing, but that didn't happen. It doesn't quite lie flat either, but this is definately not a beanie. Serve me right for trying to put in fancy stitches! One day I'll get around to following Rachel's beanie pattern to complete one, which now I know what I was doing wrong, I'm sure will work just fine. I'll keep this large flower thingy for another project I'm working on.
Another small project I had open to look at was a dancing shells washcloth pattern at All Free Crafts. It didn't look too hard so I gave it a go, but my cotton is too thin. A fair few American patterns call for "weight worsted cotton" and all I've been able to find out is the Australian equivilant is a 10ply which doesn't make sense to me. I think my mum will know, so I'll ask her next time I speak to her. A new stitch I learnt here was Dc2tog (double crochet two stitches together) and again, I learnt how to do it from a youtube video. I actually unwound this little exercise to reuse the cotton.
My mum gave me several balls of this lovely cotton so I was determined to do something with it and tried one of the many patterns she gave me. This square motif was easy enough and if I made 38 of them, I could make them into a top. I wonder if I'll get around to doing that one day .... lol! If I went to that much trouble, I would want to be sure to wear the thing!
I have lots of pictures of crochet hearts bookmarked to try, including some from the Drops website. I didn't follow the pattern for this Christmas heart decoration, I just looked at the picture and did it very quickly. I simply SC a 6 x 6 row square, then 5 trebles into the middle 3rd space, then ch st around the edge. Easy as! Lol, more crochet junk to work out what to do with ....
After I did the square heart, I set to work on making a toy shrug. Now that was a full day's worth of work! /satisfied sigh
four leaf clover |
Irish Rose |
a flat circle with scallop edges |
details of scalloped circle |
blue square |
crochet stitch sample |
blue heart |
Saturday, January 23, 2010
Hardest Heart Yet
This is the most challenging heart I've crocheted yet as I found following the pattern very difficult!
Using the pattern at Inspired Crochet Design, I sometimes had to guess what was meant by the pattern. I don't know if the pattern is flawed, or if it is my lack of skill in reading patterns that made it difficult, but I think the latter is more likely! I unravelled the 3rd row a couple of times before I had to guess what the pattern meant. I didn't know what hdc was and this was the first time I remember seeing it. I learnt how to do this "half double crochet" stitch from watching this youtube video.
Somehow, it works out in the end looking somewhat like it was meant to! Yay for me!! ... lolzz
Recycled Jeans Bag
This is my first attempt at recycling an old pair of jeans into a bag. I remember a couple of friends from school used to make bags or skirts by cutting off the legs of old jeans. But when I was a teenager I never had the luxury of having an old pair of jeans to cut up, so have been wanting to try this now I can!
For skirts they would sew a large square of material to the bottom after the legs were removed, and kept using the top of the jeans, leaving the buttons as they are. I can't remember if they would line their bags, but I gave it a go here. I haven't lined anything before and I could have done it better, that's for sure! I didn't match the width of the lining with the width of the jean waist so had to gather some lining to make it fit. The hardest part was sewing the lining to the jeans and then threading the cord through the lip I made in the lining. If I was going to do this again, I'd make the lining fit before sewing it, and I'd make the lip for the cord wider.
Perhaps this bag would be better if I made a handle out of the legs and sewed it up the sides ...
Friday, January 22, 2010
Restoring an Old Dusty Cane Basket.
I've had this cane basket for ages, I really liked it so have hung unto it. It would make a great bread basket when serving bread rolls for guests, if it was clean!
This was in such bad shape I was thinking I would have to chuck it, but I didn't because I have inherited that 'I can't throw stuff away' thing from my mum! So I picked it up this morning and had a go at weaving back in the loose cane threads and decided to look up how to clean cane on the internet.
I found a site that explained how to clean cane baskets, which also had other information about wicker. I found out from there that I shouldn't submerge my cane in water. Good thing I read that first, as I was considering it! You clean the dust off the cane with a brush, like a toothbrush, which is what I used. This site also suggested using linseed oil to polish it up. Now, I know that stuff is expensive and wondered if I could just use olive oil. I have heaps of that as I buy it in lots of 4L when it's $5 per L. So I did a google search and found something about using olive oil to polish wood furniture. So I used the recipe, figuring what's the worst that could happen? I could ruin the cane and throw out something I was going to throw out anyway.
Instead of vinegar, I choose the lemon juice option as I thought that would smell better. I think it does smell nice now, a little like new cane from the shops, which makes me wonder if they use something similar. I put 3 parts olive oil to one part lemon juice in a recycled garlic jar and shook it up. Using the toothbrush, I rubbed a little of the mixture to clean and polish the cane. I then left the basket in the sun to dry. Since then I've used it as a bread basket when David made up a beautiful batch of sweet bread rolls.
I made a label for the jar in case I needed to use it again soon, and stuck it on with some wood glue. It was my first excuse to use the new pinking shears I invested in yesterday. They were so expensive, but I was assured it was an excellent brand so I'm going to really look after them so they last me forever!
Junkmade Drop Spindle for Plarn
The plarn made from a freezer bag was tricky to crochet yesterday because it was not spun. What I needed was a drop spindle! I had a vague memory of a spinner that involved an apple somehow which I was shown when I was a child at school. I also remember being taken on an excursion to a retired school teacher's house who had a big proper loom which she would use a shuttle with to weave cloth. That earliest of memories inspired me long ago with a dream of making my own things.
But how to make this apple spinner? I couldn't find out how to make it on the net, but I did find out how to make drop spindles from all sorts of things like CDs and cardboard, and some I'm sure a lot more elaborate than they needed to be. I didn't see the point in buying all those materials new to make something so simple. I was off to Lincraft today and I thought to see if they had any ready made, as they might be better balanced. If they didn't or it was too expensive, I'd just get some hooks and some dowel to make my own simple one. Unfortunately, they had niether spindles nor the materials to make one, although they did have everything else on my wish list.
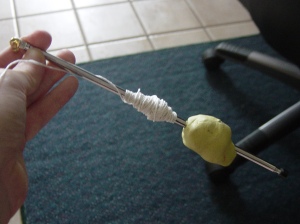
I was keen to crochet some more freezer bag plarn, but it really did need to be spun. Now I had researched the principles of drop spinning, I scouted through my useful box until I found some materials that might work. This is my first attempt at making a drop spindle which I've used to make plarn from one freezer bag.
I used a long stick with a hole in the end. This one is an old TV antenna, and I have it because I liked how it's length can be decreased or increased like a telescope. I thought to use it in my teaching, but I never ended up really using it there, I have little idea why I've hung onto it for so long. I guess today must be the reason! I used one paper fastener pushed through the hole then wound around like a hook. I then wieghted it down with a big ball of old yellow tac.
This drop spindle was easy for me to work, although I don't remember using a drop spindle to spin yarn before, after a moment it seemed almost instinctual. You are simply twisting the yarn, I always spun the one way going clockwise so the yarn wouldn't unravel. When one piece of plastic was spun, I'd unhook it, wind up the excess plarn, hook it back up. I then put the base of the spindle between my toes while I added another piece of plastic to the previous plastic then spun that. It only took a moment to spin a freezer bag into plarn. This is a good youtube video on a homemade drop spindle.
So, what can I make with this spun plarn? i just had a quick go at starting a headband using a stitch I did for a belt a while ago, but I think I got it wrong. I didn't reread it, maybe I should have!
But how to make this apple spinner? I couldn't find out how to make it on the net, but I did find out how to make drop spindles from all sorts of things like CDs and cardboard, and some I'm sure a lot more elaborate than they needed to be. I didn't see the point in buying all those materials new to make something so simple. I was off to Lincraft today and I thought to see if they had any ready made, as they might be better balanced. If they didn't or it was too expensive, I'd just get some hooks and some dowel to make my own simple one. Unfortunately, they had niether spindles nor the materials to make one, although they did have everything else on my wish list.
junk made drop spindle |
all the items I used to make a junk drop spindle and white freezer bag plarn |
closeup of a homemade hook made from a stationary butterfly clip |
This drop spindle was easy for me to work, although I don't remember using a drop spindle to spin yarn before, after a moment it seemed almost instinctual. You are simply twisting the yarn, I always spun the one way going clockwise so the yarn wouldn't unravel. When one piece of plastic was spun, I'd unhook it, wind up the excess plarn, hook it back up. I then put the base of the spindle between my toes while I added another piece of plastic to the previous plastic then spun that. It only took a moment to spin a freezer bag into plarn. This is a good youtube video on a homemade drop spindle.
this is what crochet white freezer bag plarn looks like |
Thursday, January 21, 2010
Wonky and Blue
<<< While I was surfing the net for inspiration I stumbled upon this seemingly simple small heart pattern. I had success with the pattern from Crochetspot, so thought I should give this one a go, too! It's a little wonky I know, but I think my next one will be less so. I don't know what I'll do with it, but who knows, it might end up as a bag handle end or something, lol.
>>> I used the same wool as I did yesterday when I whipped up a quick project at the end of the day. I got the idea to make a scraptrap from Granny Judith's website. But I figured I could use it as a pin cushion when it was done, instead of a child's toy. I didn't use any pattern, I just made it up as I went along, so like my blue heart, its a little wonky! But for a pin cushion, I have a feeling that's going be quite ok (take That, perfectionist tendancy!) And at the end of the day, I had a heap of cotton and scraps to go in it already. It was an excellent way to finish up the day, with a quick tidy up!
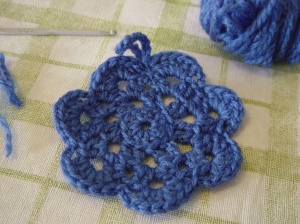
<<< While I'm waiting to go to the doctor, I'm keeping myself busy so I whipped up this one in a few minutes. I really liked this photo of a ten petal flower doily. I just looked at the picture and tried to copy it. My flower only has seven petals because I didn't count the dc in the 1st round. I just ... gave it a whirl!!
Green Plarn Spiral Scrubbie
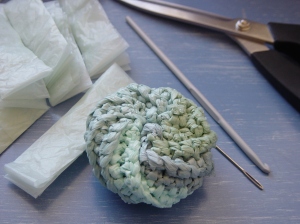
This spiral scrubbie is green in more ways than one! This pattern by Judith Prindle can be found at Crochet Patterns Only but because I can't read crochet patterns well, I watched a utube video by Donna from Naztazia. Donna was excruciatingly painful for me to listen to, but at least I worked out the pattern thanks to her. The materials needed are 4 plastic shopping bags (I used green coloured ones), a pair of scissors, a very large sewing needle and a mid-size crochet hook.
I don't know if this dish scrubber was worth the effort to be honest, because now I have sore wrists and a blister from working with the thick plastic all afternoon. Dish scrubbers usually only cost a dollar or two from the supermarket. One good thing though is, by making my own dish scrubber from recycled material, I'm doing my bit to disrupt the imbalance in our consumer society. Believe it or not, we actually don't Have to buy absolutely everything from the capitalists! Another good thing is the simple satisfaction of making something myself that is actually of practical use.
The first step is to make some plarn. I do it the way Rachel Choi taught me from Crochetspot. I only cut up one bag at a time so I don't have too much left over, and it also gave my hands a break from working with the stiff plarn.
[gallery columns="4"]
1. I then made a rhombus shape by adding a stitch at one side and dropping one at the other, this is with single crochet.New rows are added in the back loop to give the ridges.
2. Then you sew up the edges of the rhombus to make a tube. Sewing it in a rhombus shape will give it the ridges for scrubbing and the spiral effect at the end.
3. Then thread the plarn through the large sewing needle. Sew in and out along the top of the tube and pull tight. As its made out of plastic, the plarn had a lot of stretch in it so I had to pull little by little to bring it in. Do the same to the other lip of the tube using the other end of the plarn.
4. Pull one end of plarn through the centre so you can tie both pieces together to finish it off.
Special thanks to these ladies for free patterns and demonstrations
Rachel Choi @ Crochetspot
Judith Prindle @ Crochet Patterns Only
Donna Wolfe @ Naztazia
Wednesday, January 20, 2010
What can I make with Plarn?
Plarn is yarn made from plastic shopping bags. I first saw the pattern on how to make it at Crochetspot, but there are heaps of other sites on plarn on the internet. You can see some examples of the types of things people make with plarn to sell on Etsy, a UK site for handcrafters to sell their wares.
The idea to try rag rug making came to me yesterday because some small rugs I have in the kitchen are getting pretty old. But when I inspected my megre collection of material scraps, I didn't feel inclined to rip it all up into 1 inch strips to make a rag rug, in case it didn't work out and I wasted it all. But one thing I do have a lot of is pastic bags, I even gave a bunch to my sister-in-law last month, as well as throwing away another bunch before Christmas, as I just had too much rubbish in my house. For some rag rugs, you simply crochet 1 inch strips of cloth into a flat round. So I gave making this plarn thing a go, planning to try a round. I figured the worst that could happen was it wouldn't work and I would just throw the plastic away.
The first thing I tried was just making a simple round using my biggest crochet hook and the same coloured bags. The colour I have most of is this horrid army green colour, it makes me feel like I'm in the military! This first round I tried used the plastic from 10 shopping bags. I added one row of a paler green colour, just to try. I really do not know what will become of this object, as it was just a trial.
As I was surfing the net last night for ideas on what to make with plarn, I saw a foto of what I think was a doily made from a freezer bag. I haven't got a lot of practice making doilies, I find them a bit impractical, although I do have a few special ones my great-grandmother made. I was about to throw away a freezer bag after dinner when I thought I might try making a small flower. This is made with the very smallest of my crochet hooks, a 1.25mm, and using the pastic from just one freezer bag. The diametre is 5.5cm. Again, I have no idea what practical use this object could have, it was just a trial.
From what I've been able to see from surfing the net, most objects made of plarn are shopping bags and handbags. These take 50 to 100 plastic shopping bags to make. As I only have about 50 here, if I'm going to use them, I need to think about what practical objects for my home I can make with that amount of plarn. I've already sorted it into colours, although I don't think I have enough of the nicer colours to make one thing. Maybe I can make something like drink coasters, flower hairpins or a shower puff. Hmmm, wonder if I'll ever need an Easter Egg Basket!
Watch this space!
edit: What else to do with a plarn small flower doily but to hang it beside other useless danglies in the window?
Crochet Mobile Cover
These things could look really daggy, but this one is a lot nicer than my very old, falling apart horrid black thing I used to keep my fone in!
The colour of wool to use is important, this one is beautifully soft and pretty with shiny fibres through it. I didn't follow a pattern, just the sight of my old mobile cover was enough to inspire me. This was really simple to do as I made it up as I went along and finished in less than an hour and a half. If I made another one, I'm sure I would be a lot quicker!
1. Crochet a chain as wide as the mobile fone.
2. Add rows of double crochet until you have a length that is twice that of the fone, sometimes add extra stitches as you go to make the tapared shape.
3. Fold the piece lengthways in half and slip stitch down the side.
4. Contine a row of slip stitch along the bottom for decoration and shape.
5. Slip stitch back up the other side.
6. Chain as long as the opening is round plus some for extra tie.
7. Cut the wool, leaving a little for the final stitch.
8. Hand weave the chain in and out of the double crochets in the top row.
9. When the chain comes full circle, use the little bit of wool to slip stitch into the beginning of the chain and tie tightly.
Its Time To Go .... Old Mobile Cover!!
Tuesday, January 19, 2010
Lovey Dovey Eyemask
After a late night raiding, David wanted to sleep in but complained of the light waking him up. He joked he needed an eyemask like mine, although his needed something 'loveydovey' on it! 'Oh, I could do that' I said and this is what I came up with!
I decided to use some left over red cloth that is like that brushed cotton, nice and soft. I thought that would make a nice sleeping mask. I considered cutting out lovehearts and sewing them on where the eyes should be, but knew that shape is tricky to hem and not have fray. I came up with the idea of using a simple embroidery backstitch using loveheart cookie cutters as the template. But what could I use to draw the shape onto the material? Most pencils and pens would not work, and a permanent marker might show through to the other side. What I needed was some white chalk ... I used to have some stashed away, but I hadn't seen it in a while so I must have gotten rid of it. Then I remembered the set of screwup children's crayons I had in the guest room. Why would they have put white crayon in a child's colouring set, I had wondered. Well now I know. So I can use it for my sewing!! It worked perfectly.
To make this sleeping mask, I used one I already had as a template.
1. Using an eyemask as a template, cut a shape that is twice the size with the top being the fold. Leave a good inch for the seams.
2. Embroider any pattern or words you want on one side, draw any outline on the wrong side of the cloth.
3. Fold in half with the wrong side of the cloth on the outside, and machine sew down one side and along the bottom.
4. Turn in the right way and place a layer of packing sponge inside.
5. Turn the opening inside and machine sew the edge, keep going around to the other side so it looks even and neat.
6. Cut a 2 inch wide strip of matching material, fold the edges in and sew on the right side, making sure there is enough space inside the tube for a safety pin.
7. Measure the length of elastic you'll need to fit comfortably around the wearer's head, use safety pins to pin the elastic to the mask to get an accurate measurement.
8. Using a safety pin, thread the elastic through the thin tube (use a large safety pin at the other end of the elastic so you don't loose it inside).
9. Use safety pins to pin the covered elastic to the mask and recheck your measurement just to be sure.
10. Hand stitch the covered elastic to the eyemask, about halfway down each side.
What comes out must fit back in?
After my brother and his family visited, I left my airbed folded up ready for the war of push and shove that would inevitably ensue. How is it these things never, Ever fit back into the box? Oh yes, I'm supposed to spend half an hour tightly folding it, inch by inch, squeezing every little goldfish bubble of air out of it as I go. Just so the thing will go neatly back into the box that it came in.
I decided to invest said 30 minutes into making a bag instead, one that was generously sized so this would no longer be an issue! I have metres upon metres, of cheap blue cotton material saved from my old life. These were purchased for a sea musical I directed for a primary school where I was the music teacher. For certain scenes of the show, we had a couple of kids hold the ends of these swathes of cloth, moving their arms up and down so they would make waves. Lol! I just have to laugh at the silliness of it, where did I get those ideas from? I didn't want to waste the material so saved it for a rainy day like today!
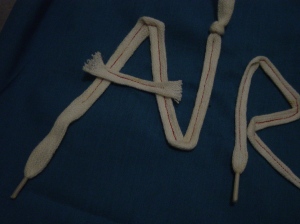
To make this very simple bag a bit more challenging, I planned to sew the letters for A-I-R-B-E-D on it. I had several options, but in the end went for white shoe laces (of which I have a copious amount and I don't know why) with contrasting red thread. Actually, the thread was red from working on another project but I thought it looked nice so kept it. Once the lettering was done, sewing up the bag was very straight forward.
1. Cut a piece of material twice the size of the object you want to go in the bag, plus a couple of inches extra to make it easier to go in, and for seams.
2. Using pins, plan where the shoelace writing will go, plastic ends of laces will be the ends of letters, so you don't have to hem edges.
3. Machine sew the shoelaces with a contrasting thread, let the cut ends of laces fray for added effect.
4. Machine sew what will be the lip of the bag, make it wide enough for a nappy safety pin to go through.
5. Turn the lettering to the inside and sew down the two sides (the 3rd side is folded).
6. Turn the bag right way around.
7. Attach a nappy safety pin (I find those easiest to handle) to the end of some brightly coloured cord, and thread it through the lip of the bag.
voilÃ
Monday, January 18, 2010
The Best Way to Serve Nachos
Whenever we've eaten nachos at restaurants or elsewhere, David and I are usually disappointed by how it's served. You have to eat all the dip before getting to the chips at the bottom which are almost always soggy by the time you get there.
I made my version of nachos for David last week and here's a picture! We have a separate small bowl each which has some nacho salsa in the bottom, and I serve this with a fork. On top of the nacho salsa I put a sprinkle of grated cheese, a dollop of sour cream and some sweet chilli sauce. Some plain corn chips are then stuck in the top where you can get to them easily, the rest of the corn chips I serve in a separate bowl.
I'd forgotten I had bought some prepared nacho salsa, as its been ages since I've made this and thought I might need it. But I went on auto pilot, this being a common recipe from my past. I made a vegetarian salsa for the nachos, with a red kidney bean and tomato base. Here's a photo of the ingredients before I began. I also added some soy sauce and sugar later to taste.
Vegetarian Nacho Salsa
1. fry a finely chopped onion, a diced capsicum and some mushrooms, a fresh chopped chilli with seeds removed, a teaspoon of garlic, some olive oil
2. move the mixture to one side of the pan while you add a drained can of red kidney beans and squish them lightly with a potato masher
3. add a can of chopped tomatoes, stir it all up well
4. add fresh herbs like oregano and basil, also soy sauce and a tablespoon of sugar to taste
5. serve with plain corn chips, grated cheese, sour cream and sweet chilli sauce
Saturday, January 16, 2010
Lavendar Afternoon
Last Easter, when we visited David's father and his fiance in Stanthorpe, we stopped by a lavendar farm and got our very own lavendar plant to grow. So far it seems to have adjusted to the climate change (it can get very cold in Stanthorpe). We gave it a good sized pot and put a lucky grow charm at the base. I'm trying to shape it by pruning lightly. I'm supposed to do this after it finishes flowering I know, that's why there aren't as many flowers on it as there otherwise might be. After the flowers finish, I deadhead them and keep the dried flower. It prefer's a sunny spot and a good water, but doesn't like to sit soaking.
After the stresses of the morning, I knew I had to take my stress management into my own hands and decided to make a lavendar bag! I made this one in about 30 minutes and did it by hand, not machine, as I did it for relaxation more than anything. It's quite easy, this is how I did it.
Fold a scrap piece of pretty material in half with the back of the material on the outside, the front facing each other inside.
If a seam of the lip will fray, hem it first using blanket stitch and some matching coloured thread.
Using backstitch hand sew down the side of each of the two edges.
Turn the bag right way out.
Fold a scrap piece of thin white ribbon in half, put a knot in the end.
Sew the half way point of ribbon about an inch down from the top of the bag.
Put some tablespoons of dried lavendar inside and twist the ribbon around the bag to close it.
On one of our trips to Indoorpilly with David's mum and his sister Michelle, we stopped by the T2 Tea shop, which is full of relaxing teas. While we were there, some tea cups and saucers fell from a high shelf, as if of their own accord. One tea cup remained intact, so I declared it a lucky tea cup and bought it! I also picked up a packet of dried lavendar from there. Lavendar tea is very good for stress management and soothing migraines. I didn't know you could drink lavendar tea like that, and through trial and error this is how I've come to prefer my lavendar tea.
Add 2 teaspoons of dried lavendar to a small tea pot with a removable mesh cup.
Fill with boiling water for no more than 2 minutes.
While waiting, jiggle the pot!
Test the colour every 30 seconds to make sure its not too strong.
Add 1 teaspon of sugar per teacup of tea before sipping.
Enjoy!
I remember a song my dad used to sing to me when I was little...
"Lavendar blue, dilly dilly, lavendar green.
When I am King, dilly dilly, you shall be Queen.
Who told you so, dilly dilly, who told you so.
Twas my own heart, dilly dilly, who told me so."
/awwww
Subscribe to:
Posts (Atom)