Friday, February 26, 2010

The best pets are free

One thing that makes me sad about living here is I can't have a cat and I would dearly love one. They are such beautiful company, and for many years I've always had one around. My small collection of ornamental cats is a cheaper version of the real thing - they don't need feeding or trips to the vet!

But everything has its advantages and disadvantages. Other than all the positives about being renters, like the reduced stress for example, living in a gated community that does not allow pets definately has it upside. We are never woken up by dogs barking at ridiculous hours, by whining distressed pets left behind by their owners for the weekend, like my old neighbours used to do on a regular basis. There's no vicous barking everytime someone dares to walk past, insulting the animal's delicate sensibilities.

Instead, there's a host of beautiful birdlife that often comes to visit because there are no cats around hunting them. We put a bird bath in the courtyard a few months ago, and a small swallow regularly stops by for his morning wash. There is also a pair of doves that live here, they often hang out on my fence and come right up to my back door where I leave crumbs for them. They have a pretty pink tinge and a speckled neck, and coo-coo delicately and lovingly to each other. Sometimes, the male goes right off and won't stop his insistent love song, so I'm forced to play some music to drown him out, which sometimes does not work!

[gallery]

And then of course, there is Lizzie the Lizard. Now, I don't know how she managed it, but this lizard looks an awful lot like the one at my old place. Or maybe, there is a resident lizard in every house that does not have a cat? Recently I've seen Lizzie chase a smaller lizard across the house, unusually oblivious to me, their tails flailing wildly and comically in the air.

So I guess because I can't have a cat, I'll just have to enjoy having these less intrusive pets around. Pets who are free to come and go as they please, and bring no harm to the other wildlife around the place. Except for other lizards that happen to be smaller than them! A bird free to fly away as it chooses I find a much greater joy than one that is caged against its will. There is nothing sadder in my mind than a bird meant to fly, captured in a cage.

Thursday, February 25, 2010

What to do with a golliwog doll? Octopus Boy!!!


Octopus outfit for a golliwog doll

a small golliwog doll
Ashamed and reviled by society, poor gollywog toy could not face anyone, could not bare to be in the company of people. They assumed he was ignorant and stupid and were scared he would cause trouble wherever he went. But in his heart, he was a peace loving artist who was just misunderstood. "I can't help the way I am!" he exclaimed, alone into the night, and "Don't stereotype me!". In desperation, his fairy-god mother made for him a super hero outfit that would disguise him. Finally, he could be amongst the people proud, content in the knowledge that they would not burn him at the stake like a witch, or stone him to death in a frenzied riot. He was now, and forever will be Octopus Boy!!!!! Hurrah!

Wednesday, February 24, 2010

Pretty Covered Coathangers

Every wardrobe is not complete without a few of these covered coathangers! I don't know why I haven't made these before, they are so easy.

Many years ago I replaced all the old coathangers in my cupboard with plastic ones. But you know how these things multiply, right? Somehow, I now have three old wooden hangers in my cupboards and I'm not sure how they got there! They really needed covering, the wood catches on delicate clothes, and the corners leave imprints in the shoulders. Covering them fixes that!

I searched around on the net for ideas on how to do it, but they all  seemed a bit too fussy. For mine, I just cut up some recycled foam packaging and secured it with elastic bands. Then I simply hand stitched the pretty material straight over the top, folding in the edges, using blanket stitch. I folded in the ends and stitched that down, too. The lavender ones have pretty white buttons to secure the ends. I then finished off with a very simple little bow to cover the tiny gap for the hook. These are a cinch and don't take long to make at all.

Tuesday, February 23, 2010

Elder Uma's "What to Wear" Dilemma

Oh no! What to wear?? That is the Question!!! Here is a gallery of all the Chinese New Year outfits you can get in WoW.  Seeing as Uma had a truckload of coins to spend after getting the title, what else was she to do but to go and get every single one???
[gallery columns="4"]

Monday, February 22, 2010

Elder Uma celebrates Chinese New Year

One of my most favourite World of Warcraft seasonal festivities is the Lunar Festival, which celebrates Chinese New Year with fireworks, cookies and beautiful costumes.

I've always loved the special dresses you can get with the Elder coins, they are the most pretty in the game imho. In my old RP days, I had one of these outfits on each of my Feathermoon characters in a different colour (which was colour-coordinated with their other outfits!). At one point, I was logging them out in their RP gear so they looked nice at the starter screen. Aaaahhh, what you do when you are bored!

I've figured I would get one title for each of my 'main' toons, rather than trying to get all seasonal titles on one toon for the special mount. My druid Uma just Had to be the Elder, right? This is one of the few dresses that actually suits the tauren females! Also, I figured "Elder Uma" was a funny play on vowels which sounded right, much like how "Sigora the Explorer" suits my hunter. But I couldn't get the Elder title on Uma last year as she was only level 60 and you need level 77 to get to the Elder in Utgarde Pinnacle. I thought she had to be 80, so was aiming for that, but realised she didn't need to level all the way, so didn't. No point in levelling yet another toon if I don't actually feel like it.

Uma is an interesting character, pretty quiet,  supposedly stately and composed, so her personality seems well suited to the Elder title. But get her around Amberthorn and her impulses to /udderflash can be quite embarrassing! Now she is an "Elder", perhaps she will conduct herself with more decorum, even while in the company of handsome tauren males!!!

Saturday, February 20, 2010

Hexagon Jackets

I saw this baby's hexagon jacket at Crochet Soiree and thought it was so cute and might be fun to try, even though there isn't anyone in particular for me to be making it for!
white hexagon jacket
I didn't follow a pattern, just made a couple of hexagons and joined them together. The orange and blue one was my first try, which wasn't quite right but I thought it might do as a toy's jacket. I covered an old button with the blue wool. Then I did the white one, which fits on my big teddy. I think it looks rather pretty with the pink buttons which I haven't decided to attach yet or not.  I've been feeling a bit blue the last couple of days to be honest, but I don't feel like I'm allowed to express my opinion, even on my very own blog that no one actually reads! Go figure.
hexagon jacket for a toy

Friday, February 19, 2010

Baby Basils

We have three types of basil growing in our garden, the 'all-year-round' variety is doing very well. The sweet basil does not survive the winter, and the thai basil is currently looking a little sad.

Because the all-year-round basil is doing so very well, I researched how to propogate basil, which turned out to be a simple matter of taking some cuttings and putting them in some water. I had these on the kitchen window sill for a week or two, and they madly put out a bunch of roots. This morning I decided it was time to plant them, as the roots were starting to push the plant out of the glasses, making them fall over.

I've decided that whenever planting into an empty pot that is black, I shall first decorate it! I find the black plastic garden pots quite depressing looking and have been trying to work out how to paint them. I thought I could paint them with some acrylic paint I have, which turned out to be "epic fail", as it just washed off in water. Finally, I found some Paint Markers from the newsagent that do the job. This is my first successful plant pot decoration, a very simple red, blue and gold design. Now the healthy basil has two new babies to grow and shelter under its wings.
/awwwwww

Thursday, February 18, 2010

Hollandaise Sauce and Rosy Pink Meringues

On Saturday 13th February, the day before Valentine's Day, one of the many things we baked was David's yummy hollandaise sauce for our salmon eggs benedict. But what to do with the left over egg whites? Why, my Rosy Pink Meringues, of course!

I helped David with the emulsion step of the hollandaise sauce, which has to be done very slowly, adding one cube of butter at a time. We then refridgerated it in a jar over night. To heat it up the next day, you have to warm it very very slowly over the double boiler. If you do it too fast, the emulsion will break and the egg and butter will seperate. It is possible to do this, but on Sunday morning, it was heated a little too fast and it did break. All you have to do to save it is, put a tablespoon of lemon juice in a fresh bowl to use as a double boiler. Then add one tablespoon of the broken emulsion, mix until it's the correct consistency, then slowly add the rest of the broken emulsion one tablespoon at a time. We also discovered that hollandaise sauce, it's main ingredient being butter, makes a very yummy buttery spread on bread when it's cold from the fridge! No need to warm it over a double boiler, it's yummy cold. I reckon it tastes a bit like the kraft cheese spread.

Because hollandaise sauce uses three egg yolks, you are then left over with three egg whites. We don't make hollandaise sauce often, its a special treat which I love, so we usually make some meringues with the egg whites. I use a very simple recipe I found in my "Australia the Beautiful Cookbook" by Hayes and Gorrick, 1982, page 168. You only need the eggs whites and a bit of sugar. I also added a drop of red food dye, which I clumsily splashed on my fingers, and a drop of vanilla essence. David whisked these up using our new handwhisk, so these turned out the best so far due to the proper whisking they got! I had considerable fun playing with the gorgeous pink mixture that spooned onto the tray so delightfully. When they come out of the oven, the pink had a rosy tinge to it due to the browning from the cooking, which I think looks rather lovely. When we were eating our love heart icecream cake on Sunday, David thought to crumble one of these pink meringues over the top of it, and it was scrummy!!

Wednesday, February 17, 2010

Three Small Things - showerpuff, beaded hanger, doily

>>> I finished this pink shower puff yesterday. I used the crochet shower puff pattern from Crochetspot. It was really fun to make, the pretty pink cotton yarn I chose to try was really nice, but it took more than a whole roll. It certainly isn't the cheap option for shower puffs, as you can pick up the plastic ones for a dollar or two, and the yarn cost $3 each. It took a while to do as well, but it was a relaxing exercise. Apparently they last longer than the plastic ones, so I decided I needed to try it out in the shower. It feels like a face washer, and lathers up about as much. I'd rather the exfoliation of the plastic shower puff, so I think I'll pop this one in the guest bathroom because it is quite pretty.

<<< After I picked up David's suit yesterday from the drycleaners, I beaded the wire hanger with some old plastic beads I had stashed away. I don't have any other wire hangers, I threw them all away years ago, but wanted to try this out to see if it works. I got the idea for the beaded wire hanger from allfreecrafts. With it being summer, I'm wearing more singlets than usual and want to hang them up, but don't have enough of the kind of hangers where the straps won't slip off. I finished this hanger with some red ribbon and a cute little bow.

>>> On Monday, I bought a new dress that might do me as a wedding dress, if we actually get around to organising a wedding sometime in the next 12 months or so, which might not happen. I'm wondering if I'll be able to make myself a little cream coloured bolero to go with it, so I've started practicing and working out a draft pattern that has potental. I'm really liking the gathered petals, which is (tr 4 tog).  Part of this sample was inspired by a pattern my mum gave me, and I used some lovely lemon coloured cotton she also gave me. Thanks, mum!

Monday, February 15, 2010

Lovey Dovey Greeting Card and Envelope

I couldn't post this before yesterday, but this is the lovey dovey card I made for David, wrapped up in a custom-made pink envelope.

First, I made the snowflake from red coloured paper which I had in my stash left over from my school teaching days (I have kept soo much stuff). This measured 9cm x 9cm. I got the idea for the front of this card from the snowflake greeting card from allfreecrafts.com I carefully glued that with craft glue onto the front of a 10cm x 10cm card cut from white cardboard. I then made a paper insert with pink paper which was 9cm x 9cm. I attached it by handsewing with red embroidery thread a few stitches down the spine and ended that with a soppy bow on the inside of the card.

I finished off the greeting card with love hearts hole punched into the top right hand corner of the pink paper insert, before adding some lovey dovey words for my sweetheart! Then using some more pink paper, I folded it around the card to form an envelope, trimming it to be neat. I secured it with a small dot of glue on the inside, which I concealed on the outside with a lovey dovey sticker I bought as an impulse. Not very thrifty of me I know, but those lovey dovey stickers were very cute!

Feast for a Day - Valentine's (part two)

After much planning and a full day of preparation yesterday, this is what we actually ended up having for our special day-long celebration today for both Valentine's and Chinese New Year.

[gallery]

breakfast
Love Heart Fried Eggs with Smoked Salmon, generous dollops of hollandaise sauce and a sprinkling of fresh chives
Homemade Tomato, Capsicum, Chilli and Garlic Pull-apart Bread
Peppermint & Lemon Balm Tea with honey
Chocolate Coffee with cream & sugar

mid-morning snack
Mint & Ginger Fruit Punch
Poorman's Caviar with Corn Chips
Lemon Myrtle & Pistacio Biscotti dipped in cinnamon honey

lunch
Smoked Salmon & Carrot Sushi
more Mint & Ginger Fruit Punch

afternoon desert
Love Heart Icecream Cake with strawberries, chocolate sauce, and crumbled pink merringue

dinner
Lemon Myrtle & White Fish Cakes with Sweet Chill Sauce and Basil Fried Rice

How to make

Icecream Cake
6 scoops of strawberry shortcake icecream mixed with 6 cut up caramel chocolates, a handful of crushed cashews, 3 crumbled chocolate biscuits, press into a cling-wrap lined heart-shaped small cake tin and freeze overnight

Mint & Ginger Fruit Punch
1 can of fizzy soft drink (we used Lemon Squash), a tablespoon of fresh ginger juice (grate and mix with a little tonic water then strain), add cut up 2 nectarines, 1 orange, a handful of strawberries and love-heart shaped ice cubes, a handful of fresh mint leaves, top up with Mango Juice as required

Saturday, February 13, 2010

Out with the Old

Tomorrow, being Valentine's Day, is an extra special day this year. Not only does it fall on a weekend, which only happens once or twice every 6 years or so, it also falls on the start of festivities for the Chinese New Year!

So today, in preparation for the special day tomorrow, we are baking as much as we can in advance, then we will be cleaning the house together! /awww isn't that romantic? Yes, I could have cleaned the house yesterday when David was at work, but that would not have swept away any bad luck from this year that came into our house today (that's my excuse and I'm sticking to it!).

It's a Chinese tradition to clean the house the day before the New Year starts, to sweep away any bad luck from the previous year. This helps the new year start with a fresh clean beginning, allowing any good luck to flow into the house during the festivities. In the very least, the floors should be swept and mopped, perhaps cleaning a window and the loungeroom ceiling fan may also take my fancy. Lucky charms, like this coin I hang facing my front door, help bring happiness and wealth into the home, as do round golden coloured fruits like oranges, favoured for their resemblence to gold coins.

Tomorrow, we will be celebrating all day, with romantic themed foods, some with an Asian flavour like fried rice and fish cakes for our evening meal. Reminding ourselves of the importance of our romantic relationship is sure to attract much good luck into our home for the new year ahead!

Friday, February 12, 2010

Love Herbs

I'm working on some herbal combinations, one is a herbal tea and another is some herbs to add to pasta sauce. I'm also working on a mix of herbs to add to a relaxing hot rice pack. All the herbs I'm using come from my garden and, according to tradition, are good for love and weddings!

Marjoram is thought to be the herb for 'marital bliss' and should be added to food to strengthen love! It has a very subtle flavour, so it will be the main ingredient of my Love Sprinkles. I've read marjoram is best dried, then elsewhere I read it's best fresh, so who knows? I've dried a bunch already by hanging them up in a paper bag. I've started to remove some of the leaves to test how it holds its flavour. To that I'll add a little rosemary, which is a strong flavour, and some flecks of chilli flakes for a bit of spicy passion! These herbs would be good added to pasta sauce or maybe vegetables. I hope to try it out very soon.

For a herbal Love Tea, I use peppermint, lemon balm and pineapple sage. This makes a subtly flavoured relaxing tea. As I used fresh herbs for this, it needed to be steeped quite long, about 10 minutes. Lemon balm is well known as a good herbal tea.

Here are three ideas I'm working on for herbal combinations which are good for love and weddings.

good for herbal tea (Love Tea)
pineapple sage - weddings, wisdom
lemon balm - love
peppermint - love & sleep

good for food (Love Sprinkles)
rosemary - weddings, memory
marjoram - weddings
chilli - passion

good for rest (Hot Love Rice Pack)
lavendar - love & sleep
lemon myrtle - love & sleep
oregano - weddings & sleep


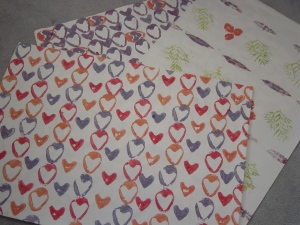
Heart-themed Gift Paper and Card

I printed up three pieces of butchers paper yesterday to make gift paper. I'm not sure what a gift will look like when wrapped in it, but hopefully the result will be a charming rustic-earthy look! Goodness knows, all there is to wrapping paper is a simple pattern, and isn't it a nicer thought if you made it yourself?

The technique is very simple, this is something I learnt during teacher training. I used a heart-shaped cookie cutter, a potato and a paring knife to cut away excess to make two stamps. I painted arcylic on with a brush, then printed that on the paper and did that with two pieces of paper. For a different print, I chose three constrasting shaped leaves from the garden, lemon myrtle, grevillea and strawberry. I painted them, and using a paper towel, pressed down on the leaf to leave a clean impression. I liked the choice of colours, if I do say so myself!

I've also been making some gift cards, which I think should be nicer than the store bought thing. I tried the kissing cards which looked like a nice idea, but it didn't work out. To make the two sides stay together I had to make a slit at each lips and push the cards in tightly, which made the rest of the faces mishapen.  Another card I tried was this cute little pop out, it's a simplified version of this pop up card video. I glued some scrap from the love-heart print left over from the boxers in the background. Cute!

Thursday, February 11, 2010

Adventures in Glass Fusing

About 4 years ago I did some glass fusing courses as I just love the look of coloured glass.  It was very technical and a bit expensive but by the end I managed to have some pretty things I made myself.

I still have a yin - yang dish that David's keys and change go into when he gets home, a drink coaster set which we don't use, plus the 3 pendants that are left, the rest I gave to my father, I presume he sold them in his shop. These were made from 96CoE glass, some of which I still have left over. With some fibre paper strategically placed, I could turn the unfused glass into some pretty beads using the kiln my father gave me.

Recently, my dad found a new invention that simplifies the process of glass fusing so much that you can do it at home in your microwave! Each of the pendants below took at least 40 minutes while we waited for the kiln to cool down, which is only big enough for one small piece. We spent more than a whole day on this, plus three failures, making these 16 pendants not too bad a success rate but very slow going. This is the 90CoE glass, which can not be mixed together with the 96CoE. If the kiln lasts long enough, I hope to eventually get around to fusing all my left over glass into pendants and beads. It looks like you can craft glue recycled magnets to the back of these so they make pretty fridge magnets, but they aren't strong enough to hold up a postcard. In the image below, the top 3 are a set that goes together, the second row is also a set I call "Peeking Kitties". David made 5 of these pendants, 3 black ones in the bottom two rows, and 2 green ones on the right of the second bottom row. David has written more about microwave glass fusing on his blog.

Wednesday, February 10, 2010

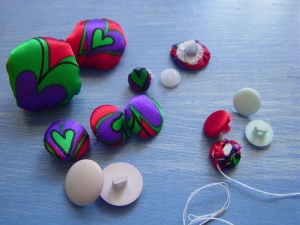
Lovey Dovey Buttons

I've been wondering if I could use recycled plastic milk bottles to make buttons, and thought to try it today with some of the left over love heart print.

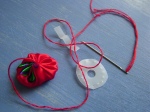
This post about how to make a fabric button made me wonder if I could make the pieces from recycled plastic, instead of buying the kits from the craft store. Buying new something so simple just to make a button seems wasteful to me. I had three goes at making the pieces from the plastic, going smaller and refining it as I went. My result is, I don't think this makes a very strong button! You could use it as a decorative button only, not a functioning one on clothing. I also cut and covered a small piece of plastic to form the missing piece for an old fabric button, which worked ok.

So then I went back to the net. This post about how to make a fabric button without a kit prompted me to go through my large button collection for any faded buttons that were candidates for a fabric covering. The large once-were-purple buttons worked the best, the smaller faded blue ones were more fiddly. By trial and error I found the smaller ones really need a round of cloth that was neither too small or too large. I also watched this video on making fabric buttons with a kit, it looks very simple and I wonder if I could make my own. I really like the picture frame on the wall behind her, it's holding 4 rows of cotton threads, looks cool! (wonder if I could make one from recycled materials ... )

So that was a productive day today - I learnt how to cover buttons with fabric! I'm sure to need that skill at some point ....

edit: I'm thinking of trying to make fabric covered thumbtacs when I've collected enough tiny plastic bottle tops (eg. toothpast etc).

Tuesday, February 9, 2010

Lovey Dovey Boxer Shorts

I found making this pair of boxer shorts challenging, but I carefully worked through the steps I knew I needed to pull this off. I took no shortcuts like I normally do with my sewing, so I'm proud of the results.

David likes the love heart motif, but would like to have some choice when buying clothes. Love heart options for women's clothing are abundant, but for men it's pretty much limited to g-strings with hearts on it. And that's just not our style! I saw this love heart printed material and decided to grab a metre with the thought to try and make him some boxer shorts. I would copy a comfortable pair he already has, but making pants in the past has usually resulted in failure. So before doing this, I made a couple of pairs of pants for toys, going so far as to use a paper pattern for the fashion doll pants. Big teddy needed some jeans, so I threw them together from the bottom part of already cut up jeans, to check if I understood the pant pattern shape. Teddy's pants wouldn't be complete without a big cheery red button!

Today I was ready to try and make David a new pair of boxer shorts. I started by making a paper pattern by copying David's black boxers, leaving space for seams, and cut out the shape. Pinning the material, I cut it carefully in half so I had two pieces of material. I folded a piece in half and pinned the paper pattern to the fold, then cut it out, removed it and did that to the other piece. Then I pinned the whole thing together first, before starting the sewing, something which I normally do not bother to do. First I sewed the tummy seam, then the back seam, then the crutch. The boxers looked huge! But when I checked the size by placing the black shorts on top, I saw they weren't too much larger. I made a pocket for the elastic along the waist, and threaded it through. All that was left to do was hem the bottom of the legs and wait for David to come home so I could check the elastic and sew it up.

Bouyed by my success, I decided to make the scraps into an itsy-bitsy pair of boxer shorts for me! To my surprise they actually worked and are wearable, David even says they are cute! Needless to say, I won't be modelling them and posting a foto!!

Sunday, February 7, 2010

Feast for a Day - Valentine's

It's important for strong mental health to mark the passage of time with friends and loved ones by celebrating special occasions together. This year, Valentine's Day falls on a Sunday so this will be the last weekend day for a couple of years. Next year, David will be at work. So David and I have decided we shall celebrate with a day long feast!


To design the menu, we came up with three words to describe our greatest hopes for our relationship, this being the time to celebrate "love". We then assigned colours and foods to these themes, then created a menu with each dish containing at least one thing from each theme. Another way to describe this "spell" we made up is to describe it as a "positve affirmation", because after you eat each dish, you could think or whisper the three romantic words together! The only hocus-pocus here is to remind ourselves of our goals for our life together, and to consolidate it in a yummy but meaningful way.

Passion - Longevity - Faith

Passion - heat, red, sweet, blood
(eg. chillies, pepper, honey, mint, tomatoes, red wine, red kidney beans, red capsicum, rosewater, strawberries, passionfruit, lamb, ham, salmon, wasabi, coffee etc.)
Longevity - life, health, trees, green
(eg. rosemary, basil, oregano, marjoram, lemon myrtle, lemon balm, olive oil, eggs, eggplant, apples, linseed, tree nuts, nutmeg, peas, dairy, flour, rice, citrus etc.)
Faith - earth, strong, white, reliability
(eg. potatoes, water, onions, carrots, chives, chocolate, garlic, ginger, groundnuts (peanuts), cinnamon, mayonaise, etc.)

DRAFT Feast for a Day menu (will post fotos of what we actually did later)
(if you use this idea on your website, please link back to my blog, thanks!)

breakfast
Peppermint, Lemon Balm and Ginger Tea (passion, longevity, faith)
Hot Chocolate Coffee with Cream (passion, longevity, faith)
Heart-shaped Eggs Benedict with Smoked Salmon and Chives (passion, longevity, faith)
Garlic and Tomato Homebaked Bread (passion, longevity, faith)

morning tea
Heart-shaped Rosewater and Peanut Cookies (passion, longevity, faith)
Spice Milk Chai, incl. caffiene, ginger, nutmeg etc. (passion, longevity, faith)

lunch
Salmon and Carrot Sushi Rolls with Sweet Chilli Sauce and Wasabi (passion, longevity, faith)
Mango Juice with sprigs of mint and ginger (passion, longevity, faith)
Apple Juice with floating strawberries and a dusting of cinnamon sugar (passion, longevity, faith)

dinner
Roast Lamb with Rosemary and Garlic (passion, longevity, faith)
Basil Fried Rice with Peas, Onion, Red Capsicum and Chilli (passion, longevity, faith)
red wine (passion) to be served in green glasses with white ribbon (longevity & faith)
Garlic and Tomato Homebaked Bread (passion, longevity, faith)

snack and drink ideas
Pistacio and Lemon Myrtle Biscotti with Honey and Cinnamon dip (passion, longevity, faith)
Hot Apple Tea with Cinnamon and Honey (passion, longevity, faith)
pappadoms with carrot and margoram dip (passion, longevity, faith)
corn chips with tomato and onion salsa (passion, longevity, faith)
Poorman's Caviar  - red capsicum, eggplant, garlic (passion, longevity, faith)

desert
Love-heart Shaped Pavlovas with Strawberries, Cream and a drizzling of chocolate sauce (passion, longevity, faith)
Strawberry Shortcake Icecream with a dusting of sweetened cocoa powder (passion, longevity, faith)

make before the day
garlic and tomato bread
rosewater and peanut cookies
peppermint and lemon balm tea
hollandaise sauce and pavlova shells (or merringues)
pistacio and lemon myrtle biscotti

A special old dress

Another thing I've been doing to improve my crochet skill is by making clothes for my small collection of toys. It may seem silly, but so far it has helped me get better, and they are there for the children to play with when they visit, if they wish. My goal is make one item of clothing for them all, but each item has the purpose to develop my skill in a certain way.
an old doll dress my grandmother made
I have saved from my childhood barbie doll collection this very special dress. I don't recall how it came into my possesion, I have a vague memory of it being given to me by another girl, maybe in a swapsie arrangement. I don't think my mum made this, but I could be wrong (edit- I've sinced learnt my grandmother Pam made this dress!). I've managed to keep it with me all these years, as it is particularly nice. A couple of Saturdays ago when David and I were at the shops, we decided I should get a new barbie doll! She was to be a model for my crochet practice, of course. I didn't realise I was still such a fan, as I had lost the last of my collection in a moving mishap after I left my first husband, but I've quickly become quite attached to my new doll, which is quite funny.

My goal was to look at the dress and see if I could copy it. I wrote down a pattern from counting the stitches on the dress and reproducing it row by row. Up until recently, when I started work on my crochet skill in earnest, I could only copy very easy things by looking at it, and I couldn't read patterns. Now I can read easy patterns. This dress has been the most challenging thing I've copied without a pattern. I'm quite pleased I managed to produce something resembling the original, although its not the same of course. I finished this exercise a week or two ago, only posted now. I made a few more things for the doll while I was at  it, practicing working with fine yarn by making the red slippers. My second attempt at making a snood was better, they're good to keep the hair in place so it lasts longer. I wrote out the patterns for practice, posted below.
my first attempt at reproducing the dress

These are the notes I made while making the dress. If you use this pattern, please link to my site.

Dress - top
starting from waist up
ch 21
1. begin 2nd ch from hook, 20 dc to end, ch 1 turn
2. (4 dc, 2dc in 1) to end, ch 1 turn
3. 22 dc total, ch 1 turn
4. (3 dc, 2dc in 1) to end, 27 dc total, ch 1 turn
5. 27 dc total, ch 1 turn
6. 6 dc,  ch 3 sk 3, 9 dc, ch 3 sk 3, 6 dc, ch 1 turn
7. dc in each st, 4 dc in armholes, 29 dc total, ch 1 turn
to finish off, work chain stitch to edge one side to form button holes
add 2 or 3 buttons

skirt - short (puffy)
starting from the waist down
1. ch 2, 2 dc in every ch sp, slip stitch into opposite side, joining the back of the dress (or for finer wool, do this a few rows lower)
2. 2 ch, 1 dc in every st all around, sl st
3. 2 ch, 1 dc in every st OR for shell pattern, 2 ch, sk 1 st (3 dc in 1, sk 1, dc, sk 1) to end, sl st
4 - 6. as row 3

skirt - long
as for short
7. 2 ch, (2 dc, 3 dc in 1, 2 dc) to end, sl st OR for shell pattern 2 ch, sk 1 st (5 dc in 1, sk 1, dc, sk 1) to end, sl st
8 - 12. as for row 7
13. to finish off, chain stitch along the edge

Mary Jane Slippers (here in red)
using the thinest thread and tinyist hook (2ply with 1.25mm hook)
1. ch 4, 5 trb into 1st chain, sl st into 1st ch sp, this is the toe.
2. ch 4, 5 trb, do not join, ch 3, turn
3.  5 trb leaving last ch of ea st on the hook, with 6 chains on hook, loop through all once to form the heel.
4. ch 12, sl st into 1st ch to form ankle strap.
take care not to cut the ends too short and weave in ends carefully to secure.

If they turn out too bulky, you can trun the slippers into socks
1. hold the ankle strap to the slipper and sl st 3 down the side (trb in the ch sp in the 1st round of the slipper toe, ch st to the ankle strap) repeat 3 times, 3 ch st strap to slipper, sc into 1st chain of ankle strap in the heel, sl st into 1st ch st of this round
2. 10 dc, sl st in 1st ch (ankle length socks)
3. for longer socks, add rows of trbs increasing with an extra stitch or 2 at the back

Snood (here in white)
1. Make a chain that fits snuggly around the doll's head, over the ears and on the hair line, slip stitch to join.
SC in each stitch around, slip stitch.
* Count the stitches in the round and divide by 9. That is the number of stitches you will skip for the first ch spaces. *
2. ch 9 (sk *, trb, ch 6) 8 times, slip stitch in 3rd of ch 6.
3. ch 9 (trb into top of trbl, ch 6) 8 times, slip stitch in 3rd of ch 6.
row 4 5 6 as for 3
7. ch 3, (trb into top of trbl) 8 times, slip stitch.

If you use my patterns, be sure to give me credit for writing the pattern by posting a link to my blog. If you make these things, please post a comment, as I'd love to know! :)

Saturday, February 6, 2010

Love Heart Rag Rug

This is my first completed rag rug and it was hard work so I don't think I'll be making these very often!
love heart rag rug made by crochet strips of material
Using crochet to make a rag rug like this uses a lot of material, so I want this to be the only one that uses material that's not recycled. Really, rag rugs should be made from strips of material salvaged from discarded clothes and sheets. But I had a small collection of cotton material squares that I'd been carrying around for ages, so I decided to put it to good use. It's all the same type of matterial and I think the colours kind of go together. Luckily I have a heap of that blue otherwise this would have turned out a lot smaller.
the material was cut into thin strips with pinking shears
I needed some new mats for the kitchen and knew I could make some from strips of material. After hunting around on the net for ways to turn recycled material into rugs, I found the best one at The Sunroom. My first attempt didn't work out because the biggest hook I had was a size 6, so I went and got myself a size 10, the biggest one they had at the shops, and started again.
rag rug in progress
Using my new pinking shears, I cut strips of ribbon from the material to reduce any fraying. I cut up one square of material at a time to give my hands a break, but my wrists hurt a little from all the hard work! lol. I spent at least two whole days on this, plus several hours here and there spread out over two weeks. I think this is a great way to reuse material that can be cut into long strips, but only if you're time-rich like me. If you don't have the time, I think paying $10-20 for a small rug from the shops might be worth it! 
the love heart rag rug in its place by the back door
But this is a good way for me to make things for my home without spending any money (other than getting a new hook which I'll reuse) and using up things that I might otherwise throw away. From what I've read, this rag rug will flatten out and I can wash it in the machine. This one is about 60cm wide and it's my Valentine's gift this year for the home I share with my true love.
/awww

Friday, February 5, 2010

The Herbs in Our Garden

One of my greatest simple joys at the moment is our cute little herb garden. Although it was a challenge to get established, it's finally starting to become productive.That might be because our companion plants like basil and lavendar are growing nicely and their smelliness is discouraging pesky pests. Taking care of these herbs is a sure-fire tonic for keeping the blues at bay.

Growing your own herbs is a very simple and satisfying way to save money too. If you love good food, you would know having fresh herbs at hand is always best. Buying a bunch of herbs from the supermarket is wasteful, expensive and just not as good as growing them in a pot at your back door and taking a sprig or two as you need it. The absolute essential herb as far as I'm concerned, which is the first one we were able to successfully grow and harvest, is parsley. It's very healthy, versatile and hardy. But now we have a bunch of other herbs that are turning out to be real joys, for example, having three types of basil and mint on hand is just wonderful!

Here is a quick break down of the herbs currently in our potted garden and what they are good for. Many also have traditional 'magic' properties too, which I think is nice to just keep in mind, even if you don't fully believe in that kind of thing. After cross referencing several websites I found common themes amongst them using various words meaning basically the same thing. So I came up with three practical catergories that are meaningful to me.

aloe vera - skin (burns and rashes), "health"
basil (thai, all-year-round, sweet) - relative to peppermint, antioxidant and antibacterial, add last to hot food, "health & passion"
chamomille - flowers make a relaxing tea, also good for the skin "health & sleep"
chilli - antibacterial, good for nasal congestion, migraine relief, high blood pressure, good in winter, increases metobolism, "passion"
chives (garlic, onion) - like garlic and onions, antibacterial and antioxidant, but milder, fresh is best "health"
coriander - wonderful fresh herb for salads, "health & passion" (weddings)
lavendar - relaxing tea, migraines, insect repellant "health, passion & sleep"
lemon balm (a type of mint) - relaxing tea, stomach aches, pre-menstrual cramps, headaches, overuse can cause insomnia "health & passion"
lemon myrtle (eucalyptus, part of the myrtle family) - a relaxing tea, good for headaches, used in cooking for a mild lemon flavour, antioxidant "health, passion & sleep"
marjoram - food preservative, relaxing tea, good in cooking, upset tummy, headaches, mild antioxidant and antifugal, dried is best, "health & passion" (weddings) "add to food to share with your object of affection to strengthen love"
mint - good with peas, juices, punch, tea, icecream "health & passion"
oregano - antioxidant rich, antibacterial, close relative to marjoram, makes a good tea for nasal congestion, dried is best "health & sleep" (weddings)
parsley - high in iron, good for high blood pressure, tummy upsets and uti, breath freshener, toothache, constipation, detox, salads "health & passion"
peppermint - tea, indigestion, tummy upsets, IBS, cough suppressant, morning sickness, relaxing herbal bath, "health, passion & sleep"
pineapple sage - tea (with lemon balm), anti-anxiety, "health, passion & sleep" (weddings & wisdom)
rosella hibiscus - native bush fruit for making jam "passion"
rosemary - food preservative, cook with lamb, good for upset tummy, relaxing baths, may protect against cancer, use liberally in food, "health & passion" (weddings & memory)

resources
www.global-garden.com.au/gardenherbs.htm
www.scribd.com/Herbs-and-Their-Magickal-Properties
windspirit57.tripod.com/id4.html
www.earthwitchery.com/herbsa-g.html
www.sunion.warwick.ac.uk/pagan/articles_magass.htm
www.gardensablaze.com/HerbMarjoramMag.htm
www.herballegacy.com/Branca_History.html
www.ehow.com/how_4436311_oregano-tea-rid-sinus-problems.html
en.wikipedia.org/wiki/Myrtaceae
Related Posts Plugin for WordPress, Blogger...