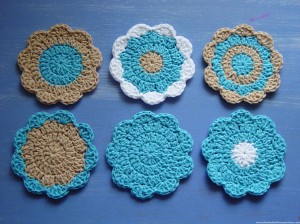
Here are the second and third sets I've made for this Summer Drinks coaster collection, I call these colour combos "Sandy Beach" & "River Boat".
Sandy Beach is mostly light blue, for the shallow ocean. Sand is the second colour for the beach and white is for the waves. Or maybe it is white for the seagulls and shells?
A simple thing is choosing 3 colours to make a set of coasters, but these have an extra thought and meaning, to help transport the imagination on those hot summer days!
Navy and white are common sailor stripe colours and is the theme of the upholstery on our "River Boat", and of course it has timber decking!
Washing instructions are ‘Hand wash, do not bleach, dry flat in shade’. Choose the darker coloured coasters when drinking red wine.
Enjoy!
Tuesday, November 30, 2010
Monday, November 29, 2010
Summer Drinks "Deep Sea" Coasters
Here is the first set of six coasters I am making to give as Christmas gifts. I hope the recipients don't think they are too silly!
I'm thinking each set will have 3 colours, a major, a minor and a highlight, which tells the story of a scene or season. This first one is called "Deep Sea". The major colour is dark blue for the deepest part of the ocean, the minor colour of light blue is for the shallows, with a little white highlight for the tips of the waves. No two coasters are the same, neither are any two coasters a negative image of each other. The even number of coasters with random patterns reflecting both order and chaos in natural landscapes.
After trying out a couple of different patterns, this one is my favourite coaster pattern from Crochetspot. I used a 4.5mm hook for this, and thick 5 ply COTON-A made by Sullivans, which is a 60% cotton blend with acrylic. Washing instructions are 'Hand wash, do not bleach, dry flat in shade'. I would say to avoid putting red wine or coffee mugs on very light colours like the white.
Making these were a lot of fun to do. Oh no! I think I'm going to make a few more ...
Sunday, November 28, 2010
Pretty Irish Rose for a Sunhat
I had a go at adding a flower to the child's sun-hat I made the other day, using a tradition Irish Rose pattern. I think the end result is very cute, if I do say so myself!
I wasn't sure how the colour changes would go, but it worked out fine. I changed colour after doing the back posts and chain foundations for the next row. I made a 6th petal, although the pattern I followed had 5, as I prefer it this way. A couple of buttons added to the centre provided just the right amount of embellishment. I'm glad a couple more of my homeless buttons have found a new home. This flower is not removable like my other flowers I make for hats, I just sewed it right on securing it tightly.
I wonder if my 4 year old niece would like this hat? I don't know anyone else this would fit, and it would be a shame if no one wore it, it's just too nice!
Labels:
buttons,
Crochet,
crochet flowers,
hats,
homemade clothes,
pink,
purple,
white
Saturday, November 27, 2010
Three Small Things - soap saver, dishcloth, square motif
<<< I don't really understand why I woke one morning thinking I needed to make a soap saver for the laundry soap, but I did! I don't usually use these things, but the soap I have in the laundry at the moment was a gift and really needed one as it was making a mess. I didn't follow a pattern as it's a pretty basic shape, but I did look at crochetspot and google for some inspiration, and used my thick cotton and a 4mm hook. I got the idea of continuing the first round all the way round the bottom of the first row from the free pattern at crochetspot, there are also pictures and patterns of other soap savers there. I've tested it out, so far so good. The plan is, when you get the little shards of soap left over at the end you keep them in the bag so you don't waste them. Very thrifty, I like it!
>>> I have been working on a spiral dishcloth using the same aqua cotton as my first cotton dishcloth, but I'm not happy with it so it's currently in my pile of unfinished projects. I bought some 'amalfi' yarn from Lincraft for $4, which is 100% cotton. I think the choice of colours look 'dishclothy', if there is such a thing, so chose the aqua greenish one. This time I made a bigger version of the basketweave dishcloth, as David asked for a bigger one. This used most of the 50g ball, there isn't enough left to make another one this size. Consolation is that this cloth can be washed and reused for quite a while, so I can get my money and effort's worth out of it. This didn't take long to do, I used a new bamboo 3.5mm I thought to try for fun. I found working with the bamboo hook that it stuck a little, and is not as smooth as using a metal one. The final product measures 22cm x 18cm.
<<< I tried this square motif, I'm thinking of using it to make some baby play cubes. This coaster pattern is at crochetspot.
Friday, November 26, 2010
My Piano, November 2010 Update
I need to keep a record of what's been happening with my piano, as every time someone comes to look at it, I forget what work has been done!
My 15 year old Alex Steinbach piano got it's first tuning in about 4 or 5 years this week, which is a bit sad. I had left it to wallow for that time while I had other things on my mind, like sorting out my life! For the record, I bought my piano new in 1994 or 1995 for $3995, and it was shipped to Darwin from Tasmania. While in Darwin I looked after it pretty well, getting it tuned every year, sometimes twice due to the monsoonal humidity. After I separated from my husband, the piano sat at my friend Nikki's house for a year or so, from there the piano was trucked to Brisbane around 2005 for the cost of $880.
While living on the north-side of Brisbane I got it tuned once, and I vaguely remember that tuner saying something about silverfish and a broken string, he left some insect repellents in there which was removed this time around. I started looking for a south-side piano tuner about 12 months ago and it's taken me this long to get up the courage to get someone in. I narrowed my search to tuners registered at the APTTA site for Queensland. I really wanted to get it done before I was 20 weeks pregnant, because that's when the baby can hear in the womb, but I am 28 weeks now so I have left it a bit late.
So last week the piano tuner I had decided upon, a local musician called Martin Holmes, comes in and says it's not worth tuning because all the felts on the keys have been eaten, probably by silverfish, and need to be replaced first. This of course tripled the price and really threw me at the time, although in hindsight it shouldn't have surprised me that much. It has been sitting idle for a long time, afterall. I was very nervous that this man unknown to me was taking out all my keys, to take away and refit some new felts, which apparently is a very fine and detailed job to do, and would take more than the weekend to complete. I had to utilise several anti-worry techniques that I've been taught this year by my counsellor to get through the week, lol!
So this time around, the key bushes have been re-felted by hand. A string has broken and will need to be replaced when the part arrives in a week or two. There is a spare broken string wound up in the bottom of the piano which might have been the original of another string which had been replaced at some earlier date. The piano has been vacuumed out, so next time we can see any new dust. Thankfully, the piano is sounding very nice again, I think Martin has done a good job, and I can't wait to get stuck back into my playing.
Now it's finally done, and I can start with my planned repertoire of children's songs, a basic piano course and some improvisation. As long as I don't need that bottom A with the broken string too much over the next fortnight, I should be right!
Thursday, November 25, 2010
Child's Cotton Sunhat
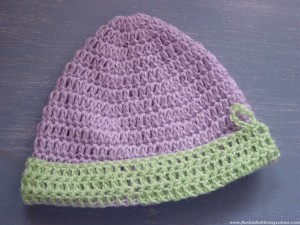
Because I had to cancel going to craft group today due to the piano repairs, I went to Lincraft yesterday instead. While there, I picked up a pattern book and some cotton for some new projects, including this child's sunhat, which I finished just this morning.
This is the last of 25 patterns in a book I picked up from Lincraft called 'cute clothes for kids' by Sue Whiting. The book looked pretty comprehensive, and I didn't think it was too expensive, so I grabbed it. Flicking through it, I was reminded how I didn't make any hats for my sister's children as they were going back to Darwin and had no need for woollen beanies up there. My sister had suggested I make my niece a sunhat, so now I have given it a go using this pattern. I found some cotton blend at Lincraft, not 100% cotton unfortunately, its a 50% cotton 50% arcylic blend, but I'm very happy with the colours and how they go together. I chose white, pink, purple and a light brown colour. For this I used a 4mm hook, and I think it took me about 3 hours, it really wasn't hard to do. The pattern says it fits a 2 to 4 year old.
Now I'm trying to decide if I want to add a big floppy flower to it, or is it better as it is? Luckily, I have some of the cotton left so I can make a flower, or perhaps a matching bag as suggested in the book.
Tuesday, November 23, 2010
Round Blue Baby Rug
This round blue baby rug seemed to take ages! I'm so happy I've finally finished it, although it's ended up a bit smaller than I thought it would be at 56cm across.
I got the idea for this one from crochetspot, they were saying round is a good shape for baby rugs. I didn't follow a pattern, I just looked at the photo for inspiration. I had already gotten a fair way into it when I realised I had 13 segements instead of 12. I couldn't believe it (wait a minute - I know how to count)! I figured it would be ok and just kept going. Maybe 13 is a lucky number in this case, well that's what I've decided anyway. This is the same pattern I used for the simple spiral white doily I finished last week, except for this rug I edged it with 5 trbl scallops. The reason it took so long is because, yet again, I used a 3mm hook and fine baby wool. Really, when I make a rug I should use a big hook and thick wool, then it won't take so very long. I must have been working on this for a month or two, using nearly 3 x 50g balls of the blue 100% Australian merino wool I got on special from Lincraft.
This year I've really gotten 'hooked' on completing projects. I don't like how I start something and have incomplete projects around, although of course I do have some of those! I just felt a need to finish this one so I can get some Chrissie presents done - now I just have to figure what I could make as gifts that will be practical and nice, that they might like and not hate!
Monday, November 22, 2010
Aloe Vera and other succulents
I have a modest collection of succulents, including some thriving aloe vera from Freya and Brian's garden in Stanthporpe. They're so easy to grow and take no fuss at all.
Aloe vera is an essential plant for any herb garden, as it's just so easy to grow. You just basically chuck a bit in a pot and pop it in a sunny spot. And if I ever have the poor luck of pulling something out of the hot oven anytime soon, I'm almost guaranteed of burning my hand, so a little aloe vera can help. Although I haven't had a chance to try this out yet, as David likes to do all the cooking at the moment, which is just great of course! Apparently you can break a leaf off and use the clear juice from inside to rub on the burn to give relief. This plant is the major ingredient in the aloe vera gels I used when I got sunburnt when I lived in the territory. You know, back in the days when I didn't have a vitamin D deficiency!
This jade money plant is very special. It was one of three plants left by my grandmother, one went home with my mum, one with my aunty and I got the third. I think my mum's plant has been eaten by her pet peacocks! I haven't done anything to this plant, just the occasional light fertiliser, and it prefers full sun. These plants are considered to be lucky for prosperity, due to the shape of the leaves, which is said to resemble coins and money.
I'm not sure if a ponytail fern is technically a 'succulent', I don't think it is, but I keep it in the same area because it prefers the same conditions - full sun and not too much water or fertiliser. I used to have a big ponytail plant in Darwin which I bought as a tiny plant in 1990, and carted it around for nearly 15 years so it grew quite big. In the mess that became my life when I left, I think my ponytail plant ended up in the garden of my friend's house which she sold during that period of time. This plant I have now is a special consolation, it's a pair bound together and they have actually produced an offspring which now has it's own pot.
The other succulents I have are plants that have kind of 'migrated' to our potted garden, and thrived, most coming from Teena's mum's garden. These plants are very hardy, and other than the aloe vera and the jade money plant, I don't even know what they are! They seem very prolific too, taking to a new spot without any fuss at all. Sometimes, I simply put cuttings and shove it in a pot with the other succulents, not even bothering to plant it in, and it still takes! Our other plants which need more care have decided they would not grow in pots that are too dry and hot with too much sun, so I have shoved some of these succulent cuttings in there to fill the fallow spot!
I am also trying some small cuttings of these in two bonsai pots I have, and they seem to be going well. I planted a tiny piece of jade money plant that broke off last year into the green bonsai pot, and it's slowly growing and will make an attractive bonsai plant. I will have to learn more about repotting bonsai at some point, as the roots will become bound. The root ball will need pruning at some point, hopefully later rather than sooner!
If anyone knows any common names for these other plants, please let me know! These cosmetic plants I tolerate in our potted herb garden, only because they are so very easy to grow, take no fuss at all and fill empty fallow spots where other plants won't grow.
Wednesday, November 17, 2010
Colourful Baby Beanies with picot edges
I made the pattern up for these beanies, because I felt like making something cute and quick!
The pattern is based loosely on the Lincraft one I used for the other beanies I've made, but this time I left a space after every increase. I prefer to do this now, so I don't have to count when to increase. Either leaving a space like in these beanies, or a ridge with a post stitch, takes away the need to count every single stitch, this way making them is more fun.
These beanies are shorter than the other beanies I've made, as I skipped the last three rows that would have gotten turned up. Then, for a flourish, I added a row of simple picot to make it pretty. And I don't think these are too pretty for a boy, although I just couldn't help myself but to make a pink one! I guess I might meet someone with a girl who might like it, or I can donate it to the hospital. All the colours except the pink one are pure Australian merino wool which I bought from Lincraft. The pink wool is some really soft, silky yarn my mum gave me ages ago and we're not sure what the blend is as it doesn't have any labels. Each beanie takes about an hour or so to make, and I used 4mm or 4.5mm hooks.
I really should stop making these beanies, in case they don't fit a real baby, I'll never really know for sure until I have a baby to fit one on! That's why I've made these in slightly different sizes, hopefully one will get worn!
Monday, November 15, 2010
Simple Spiral White Doily
I really like this simple swirling doily design, it's very easy to memorise so I can dot it front of the tv.
I've been working on this doily for quite a while, and simply stopped
when I got to the end of the roll of fine cotton. I think this was one
of the many rolls of fine cotton my mum has given me. I used my 1.75mm
steel hook which was nice to work with and not too small for my eyes
when I wear my glasses. I didn't follow a pattern, it's just the same as
my blue baby rug, which I'm still working on. I guessed what that
pattern was by looking at a picture on crochetspot,
although mine is a bit different. It really isn't hard, you just
increase a stitch once every gap of which there is about a dozen per
round.
When I finished this it was round and the edges were curled up, so it
needed blocking. I simply wet it under warm running water and pat dry
with a towel. Then I lay it on my piece of white cardboard that I use
for blocking and pinned it out, stretching it into a star shape.
I think I'll just use this as a doily somewhere? Or maybe I'll add some beads to the edge and use it as a jug cover - I'm not sure yet!
a simple white swirling doily after blocking |
this doily used one ball of crochet cotton |
blocking a crochet doily |
Sunday, November 14, 2010
Our Potted Herb Garden, Spring 2010 Update
My spring update for our potted garden is a bit late, as summer feels like it's already here! Here I like to keep a note of what the garden is doing, what's flowering now and how it went over the winter. This information is specific to where we live, on the mid-east coast of Australia in Brisbane.
What didn't last the winter? Well, we have decided that as a potted garden, we shall only grow that which wants to be grown and will not fuss over 'sooky' plants anymore! The rosella we picked up for $1 died after one crop, as good as it was, we got just one jar of jam out of it! We have also decided to give up on tomatoes. For all we have heard about how easy they are, we have not found that. It may well be they just need too much fertiliser to make the crop worthwhile. This is why we've decided to not bother with most fruit and vegetables, and to concentrate mostly on herbs. Herbs have given us the most success, are easier and cheaper to grow, are more suited to a potted garden and give us the most joy. Also, the cost of growing herbs is much better than buying them fresh from the shops, which can be expensive.
BASIL
I was expecting the sweet basil to die right back, but it now has some young shoots at the base, so after some pruning, it looks like we will get another season out of it. I have now three pots of all-year-round basil including 2 large bushes, which all seem happy and look to last. Although the eldest is showing signs of age with smaller leaves, I do still remove all the flowers to see what it will do, and these flowers are still very fragrant and are used in our cooking.
CHILLIES
Most chillies in our potted garden seem very happy, returning a good crop even in the smallest of pots. We use the red fruits in our cooking, well that is, David does! He makes a most excellent chilli jam with it. A few of the smaller seedlings did die over the winter, it may have been due to where we had them. I've moved them near the rosemary and lavender, as these are good companion plants because their scent confuses pests. The chillies like full sun and don't like to sit in water. We are hoping to try capsicums this season, as they are related to chillies so we should (hopefully) have more success with those than with the tomatoes.
ROSEMARY
Our second rosemary plant had a case of white mould just like the 1st plant did last winter, so I treated it the same way by rubbing off as much white as I could and made sure it was getting full sun. It's now looking happier, I've also staked it to stand more upright, and I've planted a 3rd shoot for hopefully another bush. Our eldest rosemary plant is looking much happier this year, I've been pruning it into shape nicely, and it's giving us a good crop for kitchen herbs.
POTTED DWARF LIME TREE
The lime tree had some yellowing of leaves at the base which turned out to be a vitamin deficiency so we treated with extra fertiliser. Also, we were more vigilant with making sure excess water is tipped out of the base, as citrus hate to have their roots sitting in water. We did some minor top dressing this spring, gently removing as much soil from the top as we could and replacing with some fresh potting mix. The roots do look quite bound, so we will have to prune the root ball next winter, which I am very nervous about. When the tree was up against the fence a whole section of leaves went strangely missing. I guessed it was a rodent nibbling on it so moved it away from the fence and we haven't noticed any more mysteriously missing leaves. At the moment, the lime tree is flowering, and it also has some tiny fruits developing. To keep the tree happy during this fruiting we really need to maintain the fertiliser, and watch the water. We pull it under the cover when it rains so it doesn't get too much, and pop it back out into the sun. This seems to keep him happy, at least for now. Last season we got just 3 fruit of it, we're hoping we get a bit more this season.
CHIVES
The chives seeded late last summer, so I collected them and planted them out in early spring. One of the older pots also got pulled open and re-potted in spring. The chives do very well in the sun, those in smaller pots need more water. David really likes to trim a bit off for his cooking, they go especially well in his dumplings and dampers, and because we have a fair bit now, he can chop a bunch off without any worry.
ROCKET
Last summer we bought one punnet of rocket, which had 6 individual plants. These got planted, and provided us with a very modest crop in the summer. It was so very pleasant to have fresh salad leaves on our sandwiches, we only wished we had more. Thankfully they all seeded late in summer and into the winter, so I diligently collected the seeds. About 3 weeks ago we planted about half of our stash of seeds in a new, large rectangle planter box. We couldn't believe our eyes when within 3 days the shoots started to appear! The weather had been humid, warm and wet. Now we are very hopeful to have a more substantial rocket crop for salads this summer!
PUMPKIN
With several small pots fallow due to the plants that didn't last the winter, we popped some pumpkin, watermelon and capsicum seeds in to see what would happen. So far the only thing that has appeared is this gainly and enthusiastic young pumpkin! Like the rocket, this handsome specimen appeared within the week. We are thinking we might be game enough to just chuck him in the ground, middle of the courtyard. What else can we do with a pumpkin? He needs to grow across the ground, doesn't he?
MINT
The mints spent the winter out in the garden sun, but when the heat returned we popped them back in the shade. Since being moved to their summer spots, the mint has perked up, as has the lemon balm and peppermint. We just have to keep the water up on these and they will be happy there.
PARSLEY
I thought the parsley would flower and die off, but it hasn't. It's just bubbling along not doing much at all. I still have 3 pots of that and it doesn't seem to have changed.
OREGANO AND MARJORAM
I pruned these when they got too big for the small pots I have them in, and they look quite attractive. I wash and dry, then de-stem the cuttings for our kitchen. They prefer sun, so I put one of the oregano plants in a pot we had hanging on our fence, but it was too dry, the pot didn't hold enough moisture and the plant died. These might prefer sun, but they also need regular water, especially if they are in small pots that dry out. I've since started again with that pot, emptying it and lining it with a plastic bag. Then I chucked in some cuttings of the hardy cosmetic succulents that have ended up here from David's mother's garden. They can try their luck in that pot as nothing else likes to grow there!
LAVENDER
I'm at a bit of a loss as to how harshly to prune my lavender bush. I pruned it too hard last summer and didn't get much flowering, so left it and now it's been flowering fairly steadily for several months. But it's getting quite big and hanging down below the pot and leaning over in what appears to be a very uncomfortable position! I'm waiting for it to stop flowering so I can prune it back. None of the cuttings I've tried to plant have taken. That's a shame as I'd prefer to have a backup plant or two, as I just love having lavender in my garden!
CHAMOMILE
This is one very lucky plant indeed. When we got it last summer, it was part of a punnet of 4 which included the peppermint which was what I really wanted, and the chamomile was looking very droopy and sad. I had a spare pot left over at the end so gave it a chance and popped it in that. It's now a year old, and has been in a sorry state. It's had a case of persistent white mealy bugs, well that's what I think they are anyway. But it didn't die and seemed stunted, it's stems growing in twisted bunches curling back upon itself. David has been occasionally spraying it with confidor, and just recently it decided it should perk up, which was a surprise! And now at last, the plant is showing it's first flowers on a long normal looking stem, after having a good old boohoo for 12 months! It's lucky, because we had decided not to fuss over high-maintenance plants, so we shall see how this one goes. Maybe I will be able to make my own chamomile tea afterall!!
What didn't last the winter? Well, we have decided that as a potted garden, we shall only grow that which wants to be grown and will not fuss over 'sooky' plants anymore! The rosella we picked up for $1 died after one crop, as good as it was, we got just one jar of jam out of it! We have also decided to give up on tomatoes. For all we have heard about how easy they are, we have not found that. It may well be they just need too much fertiliser to make the crop worthwhile. This is why we've decided to not bother with most fruit and vegetables, and to concentrate mostly on herbs. Herbs have given us the most success, are easier and cheaper to grow, are more suited to a potted garden and give us the most joy. Also, the cost of growing herbs is much better than buying them fresh from the shops, which can be expensive.
BASIL
I was expecting the sweet basil to die right back, but it now has some young shoots at the base, so after some pruning, it looks like we will get another season out of it. I have now three pots of all-year-round basil including 2 large bushes, which all seem happy and look to last. Although the eldest is showing signs of age with smaller leaves, I do still remove all the flowers to see what it will do, and these flowers are still very fragrant and are used in our cooking.
CHILLIES
Most chillies in our potted garden seem very happy, returning a good crop even in the smallest of pots. We use the red fruits in our cooking, well that is, David does! He makes a most excellent chilli jam with it. A few of the smaller seedlings did die over the winter, it may have been due to where we had them. I've moved them near the rosemary and lavender, as these are good companion plants because their scent confuses pests. The chillies like full sun and don't like to sit in water. We are hoping to try capsicums this season, as they are related to chillies so we should (hopefully) have more success with those than with the tomatoes.
ROSEMARY
Our second rosemary plant had a case of white mould just like the 1st plant did last winter, so I treated it the same way by rubbing off as much white as I could and made sure it was getting full sun. It's now looking happier, I've also staked it to stand more upright, and I've planted a 3rd shoot for hopefully another bush. Our eldest rosemary plant is looking much happier this year, I've been pruning it into shape nicely, and it's giving us a good crop for kitchen herbs.
POTTED DWARF LIME TREE
The lime tree had some yellowing of leaves at the base which turned out to be a vitamin deficiency so we treated with extra fertiliser. Also, we were more vigilant with making sure excess water is tipped out of the base, as citrus hate to have their roots sitting in water. We did some minor top dressing this spring, gently removing as much soil from the top as we could and replacing with some fresh potting mix. The roots do look quite bound, so we will have to prune the root ball next winter, which I am very nervous about. When the tree was up against the fence a whole section of leaves went strangely missing. I guessed it was a rodent nibbling on it so moved it away from the fence and we haven't noticed any more mysteriously missing leaves. At the moment, the lime tree is flowering, and it also has some tiny fruits developing. To keep the tree happy during this fruiting we really need to maintain the fertiliser, and watch the water. We pull it under the cover when it rains so it doesn't get too much, and pop it back out into the sun. This seems to keep him happy, at least for now. Last season we got just 3 fruit of it, we're hoping we get a bit more this season.
CHIVES
The chives seeded late last summer, so I collected them and planted them out in early spring. One of the older pots also got pulled open and re-potted in spring. The chives do very well in the sun, those in smaller pots need more water. David really likes to trim a bit off for his cooking, they go especially well in his dumplings and dampers, and because we have a fair bit now, he can chop a bunch off without any worry.
ROCKET
Last summer we bought one punnet of rocket, which had 6 individual plants. These got planted, and provided us with a very modest crop in the summer. It was so very pleasant to have fresh salad leaves on our sandwiches, we only wished we had more. Thankfully they all seeded late in summer and into the winter, so I diligently collected the seeds. About 3 weeks ago we planted about half of our stash of seeds in a new, large rectangle planter box. We couldn't believe our eyes when within 3 days the shoots started to appear! The weather had been humid, warm and wet. Now we are very hopeful to have a more substantial rocket crop for salads this summer!
PUMPKIN
With several small pots fallow due to the plants that didn't last the winter, we popped some pumpkin, watermelon and capsicum seeds in to see what would happen. So far the only thing that has appeared is this gainly and enthusiastic young pumpkin! Like the rocket, this handsome specimen appeared within the week. We are thinking we might be game enough to just chuck him in the ground, middle of the courtyard. What else can we do with a pumpkin? He needs to grow across the ground, doesn't he?
MINT
The mints spent the winter out in the garden sun, but when the heat returned we popped them back in the shade. Since being moved to their summer spots, the mint has perked up, as has the lemon balm and peppermint. We just have to keep the water up on these and they will be happy there.
PARSLEY
I thought the parsley would flower and die off, but it hasn't. It's just bubbling along not doing much at all. I still have 3 pots of that and it doesn't seem to have changed.
OREGANO AND MARJORAM
I pruned these when they got too big for the small pots I have them in, and they look quite attractive. I wash and dry, then de-stem the cuttings for our kitchen. They prefer sun, so I put one of the oregano plants in a pot we had hanging on our fence, but it was too dry, the pot didn't hold enough moisture and the plant died. These might prefer sun, but they also need regular water, especially if they are in small pots that dry out. I've since started again with that pot, emptying it and lining it with a plastic bag. Then I chucked in some cuttings of the hardy cosmetic succulents that have ended up here from David's mother's garden. They can try their luck in that pot as nothing else likes to grow there!
LAVENDER
I'm at a bit of a loss as to how harshly to prune my lavender bush. I pruned it too hard last summer and didn't get much flowering, so left it and now it's been flowering fairly steadily for several months. But it's getting quite big and hanging down below the pot and leaning over in what appears to be a very uncomfortable position! I'm waiting for it to stop flowering so I can prune it back. None of the cuttings I've tried to plant have taken. That's a shame as I'd prefer to have a backup plant or two, as I just love having lavender in my garden!
CHAMOMILE
This is one very lucky plant indeed. When we got it last summer, it was part of a punnet of 4 which included the peppermint which was what I really wanted, and the chamomile was looking very droopy and sad. I had a spare pot left over at the end so gave it a chance and popped it in that. It's now a year old, and has been in a sorry state. It's had a case of persistent white mealy bugs, well that's what I think they are anyway. But it didn't die and seemed stunted, it's stems growing in twisted bunches curling back upon itself. David has been occasionally spraying it with confidor, and just recently it decided it should perk up, which was a surprise! And now at last, the plant is showing it's first flowers on a long normal looking stem, after having a good old boohoo for 12 months! It's lucky, because we had decided not to fuss over high-maintenance plants, so we shall see how this one goes. Maybe I will be able to make my own chamomile tea afterall!!
Monday, November 8, 2010
Three Small Things - coaster, ornament, beanie
<<< Here is a quick spiral coaster I made in pink following the coaster pattern at crochetspot. This coaster is currently under our water bottle at our pcs to soak up any condensation.
>>> After a discussion at crochetspot about the first thing you ever made, I remembered these things I used to make as a child. I don't have any of the originals left, so made this one recently. When my mum taught me how to crochet, she first taught me how to chain, then how to crochet into a circle. I have a memory of continuing the first round for as long as I could fit the hook into the centre, making the stitches over and over on top of each other, as I didn't know how to start the next round! I didn't know what else to do with them at the time, so I made a chain handle and decided they should be Barbie doll handbags! Now this one is hanging off my pc with the purple premmie booties I made!
<<< After spending a couple of hours window shopping for babies things on the weekend, I was inspired to whip up this little beanie while I recovered on the couch! It was amazing that I had the EXACT amount of yarn left for this, which was great as I wanted to use it all up. This was the last of the arcylic baby yarn from Lincraft. I used the lincraft pattern and a 4.5mm hook. This is the same pattern as my green and orange baby beanie and my purple and white baby beanie, but this one is the bigger size for a 6 month old, as my baby is due in summer and should be in winter clothes by then.
Labels:
babies,
Barbie,
Crochet,
drink coasters,
green,
hats,
pink,
purple,
red,
Three Small Things
Sunday, November 7, 2010
Crochet Motifs in White
Here are some more motifs I made using patterns in Jan Eaton's 'crochet basics' book that I borrowed from the library and had to return last week. It such a good book, I might have to borrow it again!
Like my other motifs and false starts, these will go in my sample bag. I wonder if I'll be able to sew them altogether one day to make a big rug? Lol, not sure that will work with the lacey squares ... hahaha
- 3 Lacey squares, on pages 68-69
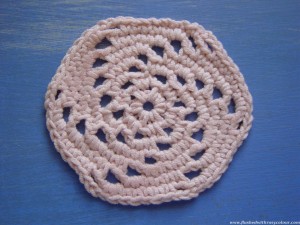
- 3 simple shapes, triangle on page 76, wheel hexagon 74, flower hexagon page 75
Like my other motifs and false starts, these will go in my sample bag. I wonder if I'll be able to sew them altogether one day to make a big rug? Lol, not sure that will work with the lacey squares ... hahaha
Wednesday, November 3, 2010
Three Small Things - coaster, dishcloth, flower
These are three small things I've made recently using patterns from Rachel's Crochetspot. Needless to say, this is one of my favourite crochet websites for free patterns and crochet related discussions.
<<< This drink coaster is proving to be handy, I'm using it by my pc to sit my bottles of water on. This was with a 4mm hook and my thickest cotton, it's great for soaking up the condensation on my drinks. The pattern for this coaster is at Crochetspot.
>>> I haven't made a crochet dishcloth before, so I started with this small one to test it out. It's about the size of a hand's palm, we've started trialling it in the kitchen, and so far so good. I made this basket-weave dishcloth with a 3.5mm hook and some thick aqua coloured cotton my mum gave me for my birthday. The pattern for the basket-weave stitch is at Crochetspot.
<<< I had a go at this small flower from Crochetspot for fun. This was with a small hook and fine cotton and is currently hanging from my pc with the my purple premmie booties.
A big thankyou to Rachel and her team at Crochetspot for these patterns!
Subscribe to:
Posts (Atom)