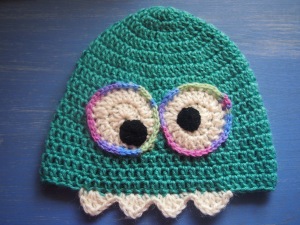
 I made this monster beanie yesterday, thinking it was going to be a gift for a 1 year old boy next weekend, but it is sooo hot right now, I really think my beanie will be an inappropriate gift! I will just have to make something else that is more summerish! Inspiration for this beanie came from googling images of 'crochet gift for one year old boy' then 'crochet monster hat', none were quite like mine.
Using some more of the sea green I have left from the Wangaratte Mill, I started by making a beanie. I fitted it to my 1 year old son's head, to make sure it would fit, using a 4mm hook. The first 6 rows are increasing, the very first round had 16 dc. The 2nd round increasing every 2nd stitch, so it's 2 dc 1 dc repeated *, which makes 24 stitches in the round. The 3rd round increases 2 dc 1 dc 1 dc, repeated, the 4th round increases 2 dc 1 dc 1 dc 1 dc, repeated, the 5th round increases 2 dc 1 dc 1 dc 1 dc 1 dc. After that, each row just has the same dc as the previous row. To make a beanie for a larger head, you increase the number of increasing rows, to make a smaller beanie you decrease the number of increasing rows. I make rows until the beanie covered my son's ears. You can make it slightly shorter, or longer if you want a turned up edge. I hope that makes sense to you, because it makes sense to me!
To make the beanie look like a monster I decorated it with two eyes and 4 sharp white teeth! The pattern for the teeth is 1 ch, 2 dc 1 ch 2 dc, 1 sc, 1 sl st, (1 sc, 2 dc 1 ch 2 dc, 1 sc, 1 sl st) x 3, for 4 teeth. Pull and pinch the ch at the tips slightly to make the teeth appear pointed. For the eyes, I made 2 flat circles in white. 1st round has 12 dc, the 2nd round has 24 as it increases 2 in every st. Then I made 2 smaller black circles, using finer black wool, I threaded the ends onto a needle to sew the eyes together and onto the beanie at the same time. To finish, I edged the eyes with varigated yarn, also from the Wangaratta Mill, to attach the eyes more securely. I think the multi-coloured edge to the eyes makes the monster more friendly looking, as does the wonky tilt to his eyes!
I'm not sure what will happen to this beanie, I might give it away, or use it as a beanie for my son this coming winter. This was so easy to make, if my friends wanted some I'm sure I could whip up some more. I like making these as the colour choice is pretty open ended, which means I can use up some of this yarn that is piling up here!
* my apologies to my fellow Australians who read UK crochet, as this is in US crochet. To convert into UK crochet sc = dc, dc = tr crochet

No comments:
Post a Comment